News and Events

Keep up to date with the latest news and events of Modular Bikes.

Friday, October 29, 2021

Fixing 50 bikes, Reid makeover and Jamis


Jamis, like Billy Ray Cypress, the gear cables were falling apart (I'm calling this cable cancer), and that was about all that was wrong with it.

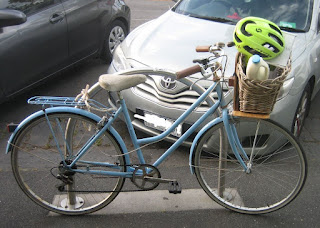
Very poor quality basket on Reid

Removing it. I had to twist the front bolts from below as it needed lots of torque to remove them.

Near the start. Chain, crank, bell top removed for a....

Soak in vinegar to derust. Note chain condition.

Relpacement basket rack

With basket on


Down the shops for a test run

Nearing completion.

Hi

I had been riding round the neighbourhood, and spotted a good junk pile a few days ago, and decided to go past it again the next day which took me on an unusual route. I spotted the Reid bike on another dumpster pile along the way and picked it up and took it the 2 or 3 streets back home. Within an hour or so, the Jamis had arrived as well, picked up and donated to Wecycle by neighbour Stu.

Despite looking pretty bad with a rusty chain and basket, the Reid has scrubbed up ok. I made a new basket support and donated a bamboo basket and its fine now. Jamis has had the gear cable outers replaced now and is also good to go.

Regards  Steve Nurse 

Update Nov 12

Although I was sick with a toothache last week, I did go along to Wecycle to drop off the Jamis.  And during the week it was delivered by Mike and Gian, here is the photo and quote, "Mwafaq from Iraq. He and his son will Rami will ride together". So the effort was well worth it.

I suspect that some of the good hybrid / commuter bikes (like the Jamis and Billy Ray Cypress) have been replaced by ebikes but have absolutely no evidence for this.


Friday, October 22, 2021

Fixing 50 bikes, 35, Oxford with Shimano Positron


As traded, by this stage I had removed the completely stuffed gearchanger and twin cables, and got the bike working in high gear.

Positron gearchanger.


Hi

A while ago, I fixed and documented working on a Malvern Star bike with a Positron II groupset, and have now brought home from Wecycle an Oxford International bike with a twin cable rear derailleur Positron. Anyway, this shows a few pics. Will post more soon, but meanwhile here is a forum post about another bike with a similar (ok, crap) setup, and another one, and another one. The Disraeli Gears site has a full service manual I can access, that's good!

Update, 24 October 2021

Spent much of today working in the bike. As the photo of the gearchanger shows, the change has 2 cables going to the rear derailleur, one pulls it left for low gears, the other pulls it right for high gears. From the link above to the manual, I found that cable assemblies (Shimano 6060010) are still available, and that would repair the bike simply with its original changer. And its likely that with a tandem gearcable, and 2 new cable outers, the same fix could be made, with maybe a small abount of finneagling. Another possible mod would be to drill or file out the changer so 2 cables would fit under the  pinning screw.

Anyway I did none of these, see photos below:

3

4

5

6

7. Steel Plate on stand bracket,

8

9

10

11

1. Took off and cleaned the stand, and made a small steel plate which is bolted onto the top of the stand bracket. It has an m6 bolt coming out of it. (Photo 7)

2. Ran a cable outer from the left derailleur cable position to the boss on the chainstay, then ran an inner cable and spring up to the bolt in the stand. After a bit of checking and spring swalling, I had the spring doing its job, moving the derailleur to the right. (Photos 4 and 9)

3. Mounted up a 5 speed gearchanger on the stem and ran a cable to the right derailleur position (4). A bit of fiddling later and all 5 gears are rechable.

4. Went for a test ride and it works well. Found a rack on hard rubbish and I will probably fit it to the bike soon.

Regards

Steve Nurse

Update Nov 22

I delivered the bike to Wecycle and its for sale now, probably not the sort of practical bike a refugee would want.


Fixing 50 bikes, 34, Fiorelli 27" to 700c conversion

As traded. The back brake was originally missing and I put on in place for this photo. A genuine bitsa as I found it, with a steel crank on one side, aluminium the other, a steel 700c alu front wheel and 27" steel back.

Close up.

Derailleur swap, long cage (on bike) replaced short cage tourney.

Fixed up. This was taken on the night Melbourne's lockdown 6 was finally over. Test ride was to get the beers shown in the pic at our very local brewpub . And I cooked dinner on a barbecue, the full extent of post lockdown celebrations.

Hi

This bike was left abandoned on the east end of our street where I've found and taken in one or two others. As traded it was a bitsa with a mix of steel and aluminium parts and 2 different wheel sizes. The front wheel was the current very popular 700c size, and I had a spare 700c back wheel and tyre, so I decided to go with all 700c alu wheels for the fixed up version. That meant bending the back forks apart, and I managed this fine by hand. The frame's relatively weak compared to the 20" front forks I sometimes bend.

Along with the alu back wheel, I added a long cage derailleur, and a 52 / 40 alu right crank. The front wheel ended up being out of true. I had fixed this a bit before abandoning it - Suzie gave me a few 700c wheels and I ended up using one of them. For the first few times I pumped up the front tire, it didn't stay on, and then came the fitting of brakes and gearchange tuning. The chain rubs against the frame on the 11t gear and I've fixed that just by tuning the gears so it only gets to the 2nd highest 12t gear when changing up. That is heaps high enough.

So the bike went well on the test ride to a pub for takeaway beers at the end of one of our lockdowns. I like the way it looks, sort of retro-cyclocross. I'm not sure this would be a Wecycle customer (refugee) bike, but it could easily sell for $100 or so.

Regards

Steve Nurse
 

Monday, October 18, 2021

Rear suspension bike summary


 For several months, I’ve been making and trialling a new recumbent bike. Its unique feature is a rear fork suspension with rubber blocks. The blocks rest inside the rectangular frame and compress over bumps. This is a new concept, but the rest of the bike – seat, tailbox, front end - is based on front wheel drive leaning trikes I have been riding for years. As with all my cycles, aims with this bike were to be aerodynamic, light and have good load capacity.

The rear fork has no pivot point and finds its own position. The fork stem is from brazed steel tubes stacked as a rectangle.  With 3d printed plastic spacers each side, a pin to hold position, and the rider’s weight, the fork can only rotate in one plane and acts as suspension. The suspension blocks are cut down portions of Mckay industrial dampers. Although other rubber material can be used (pedal rubbers, cycle tyres and tubes), the industrial dampers are designed for suspension of this type, so are stable over a wide range of temperatures.

It’s taken a long time to come to this design as I started building front wheel drive bikes with the rectangular hollow frame that could use it in about 2012. Here is a blog post from back then.

The 2012 bikes and some of the trikes I’ve built since have used Capral rectangular hollow 82.6 x 28.6 x 2.3 wall aluminium beams with a combined tailbox and seat. The tailbox is aerodynamic and has about 50 litres of storage. It clamps to the beam and slides up and down the beam to adjust for leg length. It’s removable and doesn’t need any frame holes or bosses for support or grip. The trick to using this aluminium section is that with the front wheel drive I use, there’s no frame chain stress, so stress is mainly from body weight. This means a relatively deep and thin section of tube can take the stresses and not flex too much.

Bike rear triangle circa 2012

 
2012 bike on Murray tour

The first frames of this type were fabricated by Michael Rogan from  MR Components in Hastings, and they included reinforcements and pivot bosses at the back. But since then, I’ve worked out how to do leaning trike frames at home with some custom cast parts, some 3d printing, handsaws and a drill press.  A plan for the leaning trike is on thingiverse at https://www.thingiverse.com/thing:4201871 . This latest rear fork borrows from the design of the front frame join: body weight under gravity helps keep parts together.

So far the new bike works well and I’m happy with it. For me it takes more shed time to produce than the equivalent leaning trike, but the bike back end weighs less and should have less rolling resistance. A nice modularity is also possible, with the same tailbox and front section accepting a bike or leaning trike rear end. The rear wheel and fork detaches quickly from the bike by removing one screw, then some jiggling. That should be good for fitting the bike in trains or cars.

The bike’s tailbox is still a work in progress, but I am confident I will end up with a light design. At the start my shoulders were too far back, and I’ve made  a temporary wedge that pushes my shoulders forwards but is also a small glovebox for keys, wallet, phone, camera etc.


Here are the parts for the back of the new bike and the equivalent parts for a leaning trike.


Bike back frame & wheel

Parts: 2 Custom rubber buffers, 1 custom fabricated fork, 4 3d printed guide plates, screws, custom wheel build includes dynamo (4 sets of parts)

Frame drilled one place only

Rear frame & parts weight: 4.6kg


Trike back frame and wheels

Parts: Unicycle cranks, YST bottom bracket, 2 custom bearing housings, 2 custom wheel axles, 2 standard pedal prix trike wheels from MR components. (5 sets of  parts)

Frame drilled 4 places.

Rear frame & parts weight: 5.2kg


 Forces and movement of back wheel

With 2 separate elastomers working at the same, the rear wheel dynamics aren't immediately obvious.  But each elastomer can be considered a pivot point  as well as compliant suspension, and when this is done some motion / suspension equations can be worked out. In the diagrams above, the top line is the resultant of the two lower motions. The simple version has equal spring rates and distances, and the general version has unequal distances and spring rates.


Regards

Steve Nurse


Friday, October 15, 2021

New Bike Part 12, a ride with Bryan Taaffe


Hi

Yesterday I did a bit of work on my bike. I wasn't happy with the ergonomics and felt I was leaning back too far, so added a plywood and timber wedge to the seat so I'm a bit further forward. It looks a bit crude at the moment, but having done this much I think I can make something decent. It will probably mean redoing all the corflute, but in the end it should look good with corflute covering both the new front and old back sections of the tailbox.

Meanwhile I have been in touch with Bryan Taaffe, an Irish cyclist and metal fabricator who has broken the record for an unsupported crossing from Perth to Sydney. We met up on the Kew Boulevarde and did 2 laps, about 25 k together. He's a bit faster than me downhills, but much faster uphills. Ok, he slaughters me and just about every other bike rider on the training route. But my bike (homemade front wheel drive) still goes ok compared to his (imported M5 Highraccer). 

Bryan's rig didn't have much storage space, maybe 20 litres, but that was enough for the Perth to Sydney trip, he managed things very well.

It was very good to finally meet Bryan after I'd interviewed him by phone for the OzHPV Huff magazine. We naturally talked recumbent bikes, and chatted to a lady who was interested in our recumbents and Bryan's work for the Alive charity. Will no doubt catch up with Bryan again soon.

Tuesday, October 12, 2021

Fixing 50 bikes, 33, Suzies Graduate

Cyclops Graduate

Drilled a hole through the stand retaining plate so the gear cable went through neatly

This is a before photo! This gizmo was securing the rear rack, not that well.

The right bearing cap was hard to remove and I worked this out, by tightening a large bolt onto the cap, and then keeping on turning, the cap eventually comes out.

Here is the whole assembly, I put an aluminium tube in it so the bearing surface wouldn't be damaged. I replaced this bearing cap with one with some flats on it.


Hi

This bike was dropped off by our friend Suzie, and the pedals had cotter pins, and the bearing cage had disintegrated inside the bottom bracket, so she wasn't a very happy bike. So quite good progress today, gears and bottom bracket are restored, tomorrow I will do a switcheroo on the rack and should be able to finish it off.