 |
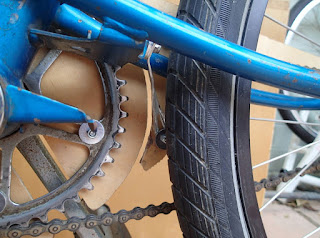
| Pic shows interference between chainguard and steerer. |
 |
| Hacked aheadset parts (top) allow brake and gear cables to get through, and |
 |
| ....... modified headsetem parts allow it to sit more vertical to avoid chainring interference. |
 |
| As installed. |
 |
| And the whole damn thing. |
 |
| Front frame detail |
 |
| Separated for transport |
 |
| Front frame end details, compared with the aluminium trike shown in this post, the front frame is much more compact. |
Hi, yesterday I put in some more work on my new trike, and with 2 bike hacks fixed some remaining problems. As mentioned
last time, the steerer bearings were loosening because I had omitted a few aheadset pieces from the steerer assembly to let the cables go through the fork tube. And I discovered another problem, part of the steerer would hit the new inside chainguard if it was steered too hard.
So a couple of bike hacks were in order, the first was to mod some aheadset parts so cables could go past them, and that worked. Taking apart the steerer clamp and a bit of grinding of parts fixed the second problem. The adjustable steerer clamp had to be more vertical than its initial limit to avoid interference with the chainguard, and grinding away bits of 2 parts helped that.
In the afternoon I took the bike for a test rides and rode it again today, no real problems except the bell is a bit loose!
Next time I hope to report on the trike being used in competition in the 2018 Ozhpv challenge in Geelong,
Regards
Steve Nurse
PS, a few weeks later. October 22
What are some of the improvements of this frame design, and what could be done better?
* The front end makes extensive use of a
Byk e450x8 donor cycle, using the rear wheel, forks, handlebars, and steerer tube bearings. This cost me $50.00 all up, not expensive in bike terms.
* The narrow 451 rim front tyre improves handling. A nearby bikepath crests a steep hill, then turns left quite abruptly. I couldn't ride this section without putting my feet down previously with a 406 rim wide tyre (the tyre would bang into the chain). Now I can ride it ok!
* I'm much more comfortable with 3d printing now than I was when I started making this style of bike frame, and don't treat it as being exotic or only for sparing use any more. So I've used
3d printing for the internal frame separators, and that has worked well. The overlap section of the frame is now much shorter.
*
Crush bars for the bearing housings are now fibreglass, this is a considerable improvement from the timber versions I had made previously.
More of the Byk could be used in the making of the recumbent, and I am still working on the steering arrangement.


