News and Events

Keep up to date with the latest news and events of Modular Bikes.

Thursday, December 7, 2017

Preparing for Ozhpv Challenge

Plastic Pot plants from recycle centre (right) will do the job of extra traffic cones, and they are very cheap at 5 - 10c each.  I am an old hand at this, having sourced cones for the Corryong event several years ago.

Newly created arrows for road race guidance.  Timber from a dumpster, laminated A4 paper, paper clamps.

Mr. T., the Miscellaneous Rolling Thing as detailed in the last post.

Shopping Race Items, the race will have 2 riders racing against each other, they will have to pick up and deposit the shopping, otherwise receive a time penalty.

Left to right, Junior, Women's, Men's and Senior trophies.


Hi, for the last few days I have been preparing for the OzHpv Challenge in Bendigo, and some of the results can be seen above.  The trike I will take is on sale through ebay, here is the link, and there is a photo of the trike below with one side cover removed . Off to Bendigo tommorrow.


Regards

Steve Nurse

Rolling Thing

A few months ago, I pulled my son's Unicycle down off the storage rack because I thought that I could make something new out of it.  My son is married and has left home, and I asked him if I could destroy his unicycle, and he said ok...... 

.....so I took apart the unicycle and removed the tyre and tube, then added 2 wheels from my initial "Vicycle" tilting trike.... 

And hey presto, this is the result.  It is a 2 wheel unicycle / rolling thing with the dummy middle wheel still in place.  You could sit on the seat, kick the top of the wheels with your feet and move along, or stand on the wheels and walk along while holding on to the seat.  Now it was easy to make but I am not a unicyclist or daredevil, so it just sat around unused for a while until.......

it got to a day or so before the ozhpv challenge in bendigo which I am organising.  Although keeping the "middle" wheel in the creation still made a rolling thing, it mostly limited its configuration to a "cranks opposite / 180 degrees" configuration, because otherwise the middle wheel would touch ground.  So I took out the middle wheel by undoing and removing the spokes, and ....

......this is the result.  Note that the cranks are at 90 degrees, and the machine does not bottom out, and this.....

is the same configuration machine with the wheels flipped to a high position.  The other position for the cranks is cranks next to each other. 
Hi, taking this new creation to the OzHpv Challenge in Bendigo this weekend to liven up the Come'n'Try event.  Peter, who I met a few weeks ago is competing with his unicycle, and hopefully a few other unicyclists will also rock up, so this should keep them amused or bemused or both.

Regards

Steve Nurse


Wednesday, November 22, 2017

Tweaking the separating frame

A few bolts I made for my bike, the one on the right is the production model, made from.......

these bits.  The thin nut works better
My current trike with rectangular aluminium frame. The seat cantilevers off the fframe and doesn't need extra support.

Bolts that keep the trike together shown at right and in front of the chain, centre.

To split the trike, take the wingbolts off, and separate the frame halves can be slightly.  In that position, the custom bolt screws into the frame and then the plain bolt screws into that.   

From there, the 2 frame halves slide apart.

Bolts are kept on the frame and out of the waywhile the trike is transported.  A new bit of bling, a Speedo mount is in the foreground.
Hi, I have been working on my bike switcheroo for a while, and in the process have been upgrading whatever I can on the bikes.  This includes fixing small problems with the trike.  On country trains, I separate the trike like this and when I do, the bolts which hold it together have to go somewhere, and previously there was no good spot for that and it got a bit awkward trying to wrangle the bike halves.  And the bolts. 

And then Ta Dah! I had an idea and slowly set about turning it into a thing made from an idea.  The photos show the results.  I brazed a nut onto one of the wing bolts with holds the trike together, and hey presto, that makes a spot for the extra wing bolt somewhere out of the way on the frame.

Even though these trikes are a long way from being in production, I did my best to make the tapped wing bolt as best I could.  At first I made it using a standard wing bolt and a tapped plate, then progressed to an m8 nut and a standard wing bolt before finally settling on a narrow m8 nut brazed nut and a standard wingbolt.  (Despite having enough parts in the shed to make a rocket to the moon,  I didn't have any of the narrow nuts in my shed and my friends at Metro Bolts gave me a few samples when I bought some other fasteners there).

And I'll get to test it out next week, I will be getting up early on Tuesday to take the train to Bendigo to promote the ozhpv challenge which will be held up there in December.  Will report, all for now.

Regards

Steve Nurse

 30 Nov 2017 update.

This is not the first tricky design I have had for a removable front wheel assembly on an HPV.  Several years ago, I made a bike and called it the X15 (after its paint colour) , and while riffling through my old SD cards came across some photos of it.  I sold it to Brett in the ACT, and as far as I know he still has it. Details of frame split on that bike are shown below.


X15 has a round tube as a frame, this means the seat assembly can't cantilever off it and be secure and not rotate around the frame. There is a small amount of seat adjustment though, a couple of bolts sticking out of the back of the seat clamp into a seat post and the clamping length is adjustable.

Front tube clamp mech.  The Cool Tool was made at home from an allen key and chromoly steel.  It has 2 uses, to tighten the clamp screw as shown here...... 

And to act as a pin securing the bike halves as shown here.

Saturday, November 11, 2017

Maruishi Leaning Trike


Hi

For the last few months I've been volunteering at the Wecycle bike shed and restoring old bikes so they can go to those that need them. Last time I was there I worked on an interesting leaning trike but didn't have my camera with me.  This time I had my camera and took a few pics.  Next (woohoo) time, I might even ride it and get some video.

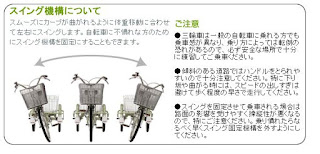
So the pics are shown above.  The trike is a Japanese Maruishi Sunday Lovely Premium Leaning trike which is apparently still available in Japan today.  The tilting function can be locked out with a set of bolts under the carry basket and the gearing seems to be very low.  Probably a great machine for a quiet pootle to the local shops, but don't go setting off for a race or across the country.

In leaning trike terms the trike is 1F1T, that is a delta (1 wheel at the front, 1 wheel tilting) where only the front part of the frame tilts.  My trikes are all 1F3T.  I'm not sure how old this Maruishi trike is but its had a bit of wear.  This sort of trike may have provided inspiration for the Varna Leaning Trike which is also 1F1T but has a semi recumbent seating position and an electric motor driven front wheel.

Update September 2020, I found another blog from Ottawa Canada, documenting a similar leaning trike to "our" Maruishi. Pictures are better and there was a super duper retso done instead of a patch up. Here is the link.

Regards

Steve Nurse

Friday, November 10, 2017

Big Switcheroo Progress


My Daily Driver


Progress on the next machine.....

Maybe turning the forks around like this would work?

Jigging for v-brake bosses on the back of the forks.


Bike bling 1

Bike bling 2
Hi

There has been some good progress in the last few days on fixing up my trikes and making one saleable.  I swapped the frames over between the "fast trike" and the one I use everyday, improving the frame as I went.  To finish off the trike I designed some red plugs for the ends of the frame tubes.  One of these includes a couple of blinky lights.  The first versions of these plugs are on my own trike and the second, slightly improved parts will be on the new one I'm selling.

And the new trike's well underway.  Unfortunately, the rear brake bosses were getting in the way of the chain and I had to braze them on in a new position.  This has worked well though and I'm happy with the results.  Along the way I contemplated a different solution: reversing the fork and the dropout positions would let the chain clear the bosses.  This would make the bike shorter overall (good), increase trail (also good) but also put the front of the trike up higher, and gravity might make the front wheel want to turn through 180 degrees (bad).  Its something I plan to try but not right now.

More work on the trikes to follow.

Regards

Steve nurse

Thursday, November 2, 2017

Big Switcheroo

"Fast Trike" ready to be dismantled.

NLT7 ready to be dismantled

A 3d printed cap for the end of the frame

Part ready to install, a frame insert for pedal and steerer bearing

Parts Ready to install: Shutter Precision Hub Dynamo Wheel and fork.

Hi

For a few days I have been sorting out in my mind what to do with all the bikes and trikes that are lying round.  I already have one trike for sale , there is another one I use most days, but I have 3 others, and might as well do something with them. If I sell one for any reasonable amount it will be worth making more of them.

So I have started work on the top trike in the photos.  This has an experimental frame with several extra holes drilled in it, and I don't want to sell it as it isn't perfect.  But the frame on the trike I took to Bendigo is good, and the plan is * to swap over the frames of the trikes, cleaning them and doing them up as I go * to fit the seat and tailbox from the NLT7 shown 2nd photo down on a trike to be put up for sale.  Sofar I have removed the frame from the fast trike and started fitting it to my current trike.  The 3d printer is coming in handy and I am busy drawing up, printing and fitting bright red end stoppers and light mounts for the trikes.

The second project is to make a bike with dynamo lights driven from the rear wheel.  For this I aim to use the parts shown in the bottom 2 photos.  I haven't been on any long Audax's for a while, but it would be nice to have a bike with bomb-proof lighting just in case I want to have a go at one.  For the moment this project will not be a priority, and I am trying to store all the bits somewhere I won't trip over them! 

All for now, Regards

Steve Nurse

Saturday, October 28, 2017

Short Trip to Bendigo

Flowers like these were all over nature strips on the way to Spring Gully

Uber-hip cafe on Hargreaves St Bendigo. Here is a link to stories about its previous lives.

More from the cafe
Op Shop Bounty from Bendigo.  The record is actually worth something, that is, a bit more than I paid for it but not enough to retire on.  It is a New-Zealand-only issue of the record from 1969, a Johnny come lately rerelease of the 1963 version. But of course.........
it comes from 1969, with record titles such as Tune-In, Aquarius, Hashish, Hair, and Be-In (Hare Krishna) spruiked on the back cover.
Hi

I have just got back from Bendigo where I spent about 24 hours promoting the OzHpv Challenge .  Its just over a month till the Challenge is on.  After arriving by train, I rode up to Spring Gully where the challenge is based and checked in to the Burns View accommodation I had booked.  This turned out to be a house given over to accommodation, you let yourself in via a code sent to you by SMS which all worked for me this time. Woohoo!  A bit later I rode the few hundred meters to the One Tree Hill Hotel and met Kevin Crockett there.  Kevin is with the Bendigo Amateur Radio Group who will help Ozhpv with some marshaling, and he showed me some ipad pictures of his radio-equipped-velomobile-in-developement.

After that I rode the Challenge road race course before heading back to Burns View for dinner.  In the evening I visited a Future Movers Forum event which involved some compulsory mingling.  There were a few people there I knew from the council like Rob Kretchmer and Chris Rowlands but spoke to many more through the activities based around meeting others and discussing transport solutions.

The next day I joined the Moroni's Shop ride which consisted of high end road bikes and included bike shop owner Peter Moroni.   Unfortunately I was unceremoniously dropped due to not knowing the route about 5k out of town and meandered my way back to the city centre, increasing my geographical knowledge of Bendigo.  I'd already had a pot of tea by the time the Moroni's group had got back after their 50k ride.  Chatted with a few cyclists at the cafe next to Moroni's and these included Michael Taylor.  Michael is a handcyclist and cycling royalty in Bendigo: last year he won the handcycling division of the New York Marathon.  I was humbled by him, he frequently rides with the Moroni's bunch, averages 30kph and does not get dropped!

After the shop ride I went back up to Spring Gully, packed up my stuff and returned to town, dropping OzHpv challenge flyers at the Spring Gully store and a few bike shops on the way.  Then I visited an op shop and went to the cool cafe in Hargreaves Street.  A local unicyclist,  Peter bailed me up and asked me about my trike and we got chatting and I handed him a Challenge entry form. He excused himself, had to go to a "business meeting" which consisted of having lunch with a couple of ladies at the cool cafe. Yeah, maybe there was a spreadsheet or two tossed around but I could think of worse places to work!

The freewheeling fun workshop is right next to the Hargreaves Street Caf and it was closed when I looked in the first time, but open a few minutes later after another op shop visit.  I spoke to Kieran Moroni, (cousin of Peter) , had a chat about the OzHpv challenge and the good works his bike shed does.  This includes having an outreach trailer which takes cycle repair facilities and training staff to people and communities around Bendigo that need them.  After that it was back to the station for the trip home.

Oh, and the record and the tea cup and the video and the other crap I bought all made it home in 1 piece.

Regards

Steve Nurse


Tuesday, October 17, 2017

A test on the fast trike


Hi

Last night I went for a ride on my new "fast trike".  In the short term the trike doesn't have a future in this form.  It looks like the next time there will be an OzHpv records meet will be in Easter next year, and I'm not sure I will attempt an unfaired recumbent trike hour record even then. For now though, the frame can be put to better use, either as a daily driver for me or a bike I can do up and then sell.

I don't for a moment regret having made this trike, even though its has been limited to a few wobbly blockies on the roads around us.  The aero wheel covers can be used for any of my leaning trikes and I can easily take the seat apart and remount it at a more sensible angle.

It is spring here now, and we have daylight savings, so I can head out at 7:30 pm when its still light and there's not too much traffic. Last night I got up to about 27kph but the brakes might have been rubbing! Aim to have another go tonight, I might even break out the bike shorts.

Regards

Steve Nurse

Sunday, October 8, 2017

Trike for sale

Timber Trike for Sale, $3000

Hi, I'm selling my timber leaning trike as documented in this blog.  This trike has front wheel drive and was built this year.  It has a hollow timber frame and weighs approx 18kg.  

38t biopace top ring, 11-40t cluster.

Frame material Hoop Pine plywood.

Adjustable seat and handlebars, suit riders approx 173 to 193 cm, 5'8" to 6'4"

Front wheel 559, rear 349.

Removable Seat / Tailbox with removable, customisable side panels and approx 50 litres of storage.

The trike uses techniques developed in my Industrial Design Master's degree.  It was entered in the  Dangerous Designs Timber Competition and the build from routed plywood was documented on my blog, click here  for a summary or begin here . A short video is on youtube .

Selling for $3,000 pick up from Clifton Hill, Victoria Australia, or can bring to Bendigo for the OzHpv Challenge.

Steve Nurse 0459341814 or (03) 94818290 or email cesnur (the at symbol) iimetro.com.au

Saturday, September 30, 2017

Behind the Photo

Oh No!
Be careful if you want to try this.
Repaired,  from outside.
Repaired,  from inside.
Hi

Well a funny thing happened.  I was writing an article for the ozhpv magazine, Huff, about the Radbot 1000 taillights so went out to take a photo of them on the bike (top).  And as I was getting the photo ready for the mag, I actually looked at the photo, and saw there was a crack in the back of the wooden tailbox.  Scurrying out the front, I looked at the tailbox, and yes, there was a crack. 

Now I knew what the problem was.  For a couple of weeks there have been some bikes and bike frames left out for council collection, and I have snaffled them for personal use as shown in photo 2.  When I was taking a damaged Repco frame-and-bits home on my bike, the snaffled frame banged  into a tree. So (slightly) broken tailbox.

Fixing the break wasn't too hard.  I'd made the tailbox in the first place and used araldite in the process, so it was no big deal to glue, then clamp the broken bits together, then find, then cut, then glue, then screw, then clamp a bit of wood to the top of the box as reinforcement.  All good now.

Regards

Steve Nurse